
My Savage Fallout interpretation of the notorious army facility known as Area 51. It's designed for a high level party of 4-5 players, though can be used for lower level or smaller groups as well by scaling down the number and variety of enemies. This dungeon features aliens, but this can easily be omitted if you don't want to feature aliens in your campaign, though scavenging area 51 without running into aliens might be rather anti-climactic. ;) Players can learn about the location from the drunken old prospector Mad Pete, or get tasked to scout it/retrieve a certain item by a major faction such as the NCR, Brotherhood, Enclave, Shi, etc. (example missions: Retrieve the Hei Gui Stealth Suit for the Shi, retrieve the TPG Ion Thruster schematics for the Hubologists, retrieve the T-55x Power Armor prototype for the Brotherhood of Steel,…) Whatever suits your campaign plot. Have fun! Sorry about the length, it sort of got out of hand… For ease of viewing I put up a PDF here.
After having journeyed through the empty desert northwest of New Vegas for near two days, you spy a large salt flat in the distance. According to the map, the abandoned facility called Area 5 is located on the southern shore of the dry lake. You carefully descend the slopes of the surrounding hills until you reach the bottom of the valley and make your way toward the lake. After walking for a short while you come to a large chain-link fence, stretching out in both directions as far as you can see. The top is crowned with barbed wire and a rusted sign warns prospective intruders about lethal voltages running through the wires. However you notice a hole has been cut in the fence, not too far from where you're standing. You go through and past the fence and eventually find yourself on the tarmac of a ruined runway. You follow the runway for a few miles and as you walk you start hearing the ominous clicking sound of your Geiger counter. In the distance you can now make out the hangars and various other buildings that make up the central complex. You pass by the destroyed power station on the way, ruined beyond repair, and as you draw closer you can see that most of the other buildings are in an alarming state of disrepair as well. Many hangars had their roofs cave in, burying aircraft the likes of which you've never seen under the debris. You make your way over to the concourse, edging past wrecked vehicles and dozens of charred corpses. You can see the main facility building ahead of you, its doors wide open…
Walkthrough
[Note: Both the surface and indoors areas are Medium Radiation zones, so players will have to make a Rad Resistance check every hour. The whole base is powered down, i.e. automated defenses, computer terminals, lighting, security cameras, elevators and blast doors are inoperative. Only the robots with their internal power sources still function, as well as the Research Labs on levels - which have their own fusion reactor. Power can be restored to the base by repairing the Back-up Generators located in Subbasement 2B]
Ground floor: The party enters through the Lobby (A). The room is a mess. The roof has collapsed in various places, letting in sunlight, and a gaping hole to the right of the entrance makes for a nasty drop to level -1. Piles of debris and rubble are everywhere and most of the furniture is ruined. Signs of previous scavengers can be found as desks have been overturned and emptied of their contents, the Staff Kitchen (B) and vending machines looted and smashed. Security cameras in the room and hallways are inoperative. Players can walk past the defunct metal detectors to the other side of the lobby. In a small booth behind bullet-proof glass stands a Protectron robot. Blast marks are visible around the window, but the glass is unscathed. How the robot got in the booth is not immediately apparent. The robot will welcome the party to the Air Force Flight Test Center, Detachment 3 of Edwards Air Force Base. He will ask the characters to state their names and pose for a picture so a visitor ID card may be issued, though as long as the power is down nothing will happen. The Protectron can provide general information about the base and give a verbal layout of the main building, being:
Ground floor: Visitor Center
Level -1: Administration
Level -2: Dormitories
Level -3: Living Area
Level -4: Security, Infirmary and Robotics
Level -5 to -7: On-site Research and Development
Basement: Maintenance
Subbasement 1: Storage Warehouse
Subbasement 2: Warehouse and Back-up Generators
He'll also warn visitors not to wander off into restricted areas. Next to the double doors are concealed Mk II Turrets. A small circular indent on the floor is the only clue as to their locations (black circles on the maps).
[Note: once power to the base has been restored and anyone carrying weapons, but no ID badge, walking through the metal detectors will become a viable target for the Turrets.]
Past the double doors are some offices, emergency stations and access to the rest of the base. The Medical Station (C) has been looted of any useful equipment and supplies. To the left is Lieutenant Colonel Casey's Office (D), in relatively good condition, though here also anything of value has been dragged out. The desk has been opened and documents are strewn about. Similarly Chief Administrator Halbright's Office (E) and Head of Research Dr. McKintyre's Office (F) have been looted and are in a bad state, with the roof collapsed in places. The weapon lockers and gun racks in the Security Station (G), likewise, have been cleaned out. The light blast door at the entrance has been blasted open with explosives. A ruined Sentry Bot lies slumped to the side. Under the debris where the roof has collapsed three bodies can be found and looted for ID badges. They include: Private Whitley, clearance level GF, -2 and -3; Private Anders, clearance level GF, -2 and -3; Sergeant Ramirez, clearance level GF, -2, -3 and -4. Wearing an ID badge with the proper clearance level will allow the character to walk around a floor without being harassed by security robots.
[Note: once the power has been restored, the clearance level of the ID badges can be upgraded, to a certain extent, in the System Administrator’s Office in Central Administration on level -1]
Going towards the elevators and staircases (H), the party passes another destroyed light blast door. A Protectron stands behind the security window, forbidding characters without an ID badge to pass through. He'll try and raise the alarm and activate the Mk II Turret in the corner, but without power once again nothing happens.
[Note: The elevators only work once the power has been restored. They are the only way to reach level -5. The players will notice there are no buttons for level -6 or -7, and next to -5 is a slot where a special key card must be inserted. This key card can be found on the body of Dr. Alisson, in the operating room in the Infirmary on level -4. There is no access to levels -5, -6 or -7 by stairs]
A collapsed room, whose erstwhile function is now unknown and a small storage room can be found on the other side of the blast door.

The rest of the base can be done in any order, though many areas will be at first inaccessible without restoring the power. They are listed here in descending order.
Roof: The caved in roof can be navigated carefully to the other side, where the satellite dish is to be found. The rotor has been severely damage and prevents the dish from revolving. It can be repaired with spare parts (found in storage rooms in the Subbasements if needed) and a Repair check.

Level -1: This level houses the base's Administration. Most of the offices have been stripped of valuables. Some rooms have caved in ceilings, though most offices remain rather intact. Enemies on this floor include Eyebots and Mr. Handy's.
[Note: The first robot the party encounters will perform a facial recognition scan, and as obviously none of them are on file, will check their ID badges. Anyone without a badge will be asked to wait until security arrives to escort them out (which will never come). If they attempt to leave the robot will raise the alarm on this level (only works once power has been restored) and attack]
The collapsed ceiling (I) has buried a small part of the kitchen and most of the storage room under debris. The body and ID badge of janitor Hopkins can be found, granting clearance to GF, -1, -2, -3, -4, Basement and Subbasements. The Offices (J) have been looted. Most computer terminals have been dragged off or are broken. Filing cabinets are overturned and documents are everywhere. At the end of the corridor is Telecommunications (K). Once power is restored and the satellite dish on the roof has been repaired, a Science check at -4 can be attempted to create a satellite uplink with the communication equipment, though without a pre-acquired contact frequency from a faction with this level of technology (NCR, Brotherhood, Enclave, Vault City, Shi, Hubologists, ...) all the players will get is static.
Central Administration (L) is located on the other side of the hallway. The System Administrator's Office (L1) sits in the corner. The computer terminal and card reader here can be used to upgrade an ID badge once power has been restored. Access can be upgraded to any level except -5, -6 or -7 as this requires the Base Administrator's prior written approval. After the first upgrade the terminal will short circuit however, needing a Repair check to get it working again.

Level -2: On this level are the Dormitories for the base's quartered military personnel. Enemies on this floor include Eyebots, Mr. Handy's, Mr. Gutsy's and feral Ghouls. The first things the party will notice are the mangled bodies on the floor. Closer inspection of their dress will reveal them to be scavengers, and a Medicine check can be made to discover that the cadavers are still very recent. Down the hall past the laundry room are the Men's (M1) and Women's (M2) Sleeping Quarters and Bathrooms (N1 and N2). Some of the soldiers survived impact of the nuclear bomb, only to be transformed into Ghouls by the severe radiation soon after, instead of dying like so many others. The robots and Ghouls leave each other alone, as the surviving Ghouls unwittingly still wear their ID badges. Most of them have tattered jumpsuits on, though some remain clad in Combat Armor. Stripping them of their ID badge will make them a target for any robot in the vicinity. The badges all have GF, -2 and -3 clearance. The footlockers in the dorms can be looted for ammunition, some pistols, pre-War money and random personal belongings.

Level -3: On level -3 general facilities for the base's personnel are located. Enemies on this floor include Eyebots, Mr. Handy's and feral Ghouls. Ghouls roam the Mess Hall (O1) and Kitchen (O2). The cook Stuart (ID clearance GF, -3) can be found dead and frozen, locked in the walk-in freezer, as well as a large supply of frozen victuals. More Ghouls have made a mess of the Rec Room (P) and the Gym (Q).

Level -4: Houses the base's Infirmary, Security, Armory and Robotics repair shop. Enemies on this floor include Eyebots, Mr. Handy's, Mr. Gutsy's and Sentry Bots. A Protectron resides in the Armory security checkpoint (R1) and will trigger the alarm and Mk II Turret if the power has been restored.
[Note: The light blast doors on this level are locked and can only be opened by using an explosive charge (object Toughness 12), or once the power is back on, a Science check to hack the pass code or a Repair check at -2 to try and short circuit the electrical wiring of the control panel]
Past another light blast door is Surveillance and Security (R2), the Quartermaster's Office (R3), the Armory (R1) and the Holding Cells (R4). Two Sentry Bots stand guard and another Mk II Turret is located at the Armory entrance. The various cabinets and gun racks here can be looted for a bountiful supply of ammo of different kinds and a random selection of H&K P90C bullpup submachine guns, FN FAL 7.62mm assault rifles, Combat Shotguns, a M60 machine gun, several Frag and Pulse Grenades and Mines and some suits of Combat Armor. All in all more than the party will reasonably be able to carry out again without incurring serious Encumbrance. The surveillance monitors in the corner can be used to get a glimpse of unexplored levels once the power has been restored. The corpse of a soldier (ID badge clearance GF, -2, -3) can be found in one of the cells, imprisoned for a night for disorderly conduct, on October 22nd 2077 , as can be gleaned from a computer terminal in the Security office.
On the other side of the hallway the Infirmary (S) is located, comprised of Chief Surgeon Dr. Martelli's Office (S1), Critical Ward (S2) and Operating Room (S3). Medical supplies can be found in the Ward and the OR, such as a First Aid Kit, a Doctor's Bag, doses of Med-X and Stimpacks, some Rad-X and RadAway. On the autopsy table in the OR a withered corpse riddled with bullets can be found. The ID badge belongs to Dr. Allison (clearance GF, -3, -5, -6, -7). From the computer terminal in Dr. Martelli's Office can be learned that Dr. Allison was apparently shot down by the automated defense system on level -5 while trying to enter the secured zone, on October 23rd, 2077 . In Dr. Allison's lab coat also an elevator-access key card for level -5 can be found. The pods at the end of the room contain various organs and a human in biomed gel. Due to the power outage the organs have slowly dissolved, and the unnamed person in the pod has flatlined.
At the end of the corridor is the Robotics repair shop (T). Lined along the wall are docking stations where robots are repaired or their programming uploaded. Some half dismantled robots lie on the massive workbenches in the center of the room, and various spare parts and some Small Energy Cells can be found here. In the wall is a recharging unit where a Microfusion Cell can be recharged once the power is restored.

Level -5: The first level of the on-site research department, this floor houses Advanced Weapons Research. Enemies on this floor include Eyebots, Mr. Handy's, Mr. Gutsy's, Sentry Bots and the Behemoth.
[Note: To enter this level, the party will first have to retrieve the access card from Dr. Allison's corpse in the Infirmary on level -4. Levels - are not reachable by stairs. A separate set of elevators and stairs connect levels -6 and -7 to level -5 which is the sole access point to the rest of the facility]
The party exits the elevator and enters a small vestibule. Two concealed Mk II Turrets are located in the back corners of the room. The door here is a heavy blast door (object Toughness 24) and can only be opened by several explosive charges, a Science check at -2 or a Repair check at -4.
[Note: The Mk II Turrets are hooked up to the separate power grid of the research labs, so they are active whether or not the back-up power has been restored. They will activate if the party fails to properly bypass the heavy blast door's security. The Mk II Turrets will open fire after the security system has asked for a retinal scan and voice verification command, which the party for obvious reasons will be unable to provide. In case this happens, the players have just enough time to run from the door to the elevator before the Turrets start shooting, if so inclined]
Once past the door, the party will see the elevators and stairs to the lower levels (U). Through the window at the other side of the entrance area the players can see a large mounted gun, the experimental Large Pulse Accelerator Cannon (LPAC) (V), a state-of-the-art pulse gun to be mounted on a tank. A blue force field bars entrance to the control room and can only be disabled by a Repair check at -2. The control room features the various consoles and computer terminals needed to operate the LPAC.
Further down the hallway is the Plasmadynamics Lab (W), where research in magnetoplasma was being weaponized. The lab has a test shooting range where some experimental weapons can be found: a Turbo Plasma Rifle (Stats: identical to a regular Plasma Rifle but with RoF 3) and a prototype shoulder-fired Plasma Launcher. Additionally a couple of plasma grenades can be found.
[Note: A Repair check will reveal that the plasma bolt chamber of the Plasma Launcher has been contaminated by radiation and has become critically unstable. The damage is unrepairable. Any attempt to fire the weapon will cause a cascading chain reaction, resulting in the weapon exploding, inflicting 3d6 damage to all targets in a Medium Burst Template]
Across the corridor is Dr. Henderson's Office (X). Information can be gleaned from the e-mails and log entries on his computer terminal. The adjacent room houses the Mechanized Armaments Lab (Y). In it is a heavily armed and armored prototype Mk II Sentry Bot called the Behemoth. The Behemoth is initially powered down and can be activated via the terminal next to the docking station with a Science check. However, when the process is nearly complete an override trojan will reset the Behemoth's targeting parameters, making him attack everyone currently in the room. Armed with twin mounted H&K L30 Gatling Lasers, a surface to air Rocket Launcher and additional armor plating, the Behemoth is a fearsome foe. The Behemoth has the stats of a Sentry Bot but has Armor +4 for a Toughness of 13(4), can make two attacks per round and is a Wild Card.
[Note: Additional options for this encounter: 1) an immediate Science check at -2 counters Dr. Gray's override trojan and the Behemoth can be programmed to assist the party. As he doesn't fit in any of the elevators he can't leave the floor however. 2) When engaged in combat the Behemoth short circuits automatically after 2 rounds and powers down]
- War of the words (part I): The following information can be found on the computer terminal in Dr. Henderson's Office: Dr. Henderson was head of Advanced Weapons Research and appears to have been locked in conflict with Dr. Gray, head of Xenology on level -7. Dr. Gray managed to appropriate the facility's supercomputer for his department, whereas Dr. Henderson clearly seemed to think his research was more important. The logs describe a series of progressively less innocent pranks the two department heads started playing on each other. The last entry reveals that it was a programmer from Dr. Henderson's department that changed Dr. Allison's security pass code. Meant to "give her a scare", this went tragically wrong when the doctor panicked, didn't give a voice command override and was gunned down. Dr. Henderson urges the programmer to keep quiet about the affair and never to mention it again.

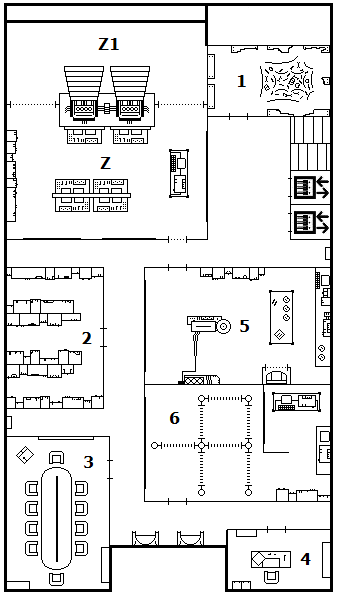
Level -6: The second level of the labs is home to the Applied Energetics department. Enemies on this floor include Eyebots, Mr. Handy's and Sentry Bots. Straight ahead when entering the level the Rocket Propulsion Lab (Z) and its Vacuum Chamber (Z1) can be seen, where the experimental Twin Penta-Grid Ion Thrusters were being developed. A start-up routine can be activated through the control panels.
Directly to the right of the elevators is a Storage Room (1) where a grisly sight awaits. In the center of the burnt-out room the blackened bones of a few dozen people can be found. Down the hall is Central Processing (2), where the labs' mainframe is located. At the end of the corridor is the Conference Room (3). A presentation is still being shown, detailing that the new propulsion engines were nearing completion, scheduled to be operational March 1st 2078 . The TPG-IT would make possible light, cheap and efficient spacecraft for the fast and safe evacuation of key government, military and scientific personnel in case of a catastrophe of global proportions.
At the end of the hallway is Dr. Bergstrom's Office (4). Inside a dead Ghoul can be found with a gunshot wound to the head and a pistol in his hand. The log on his computer terminal reveals it to be Dr. Bergstrom, who found himself trapped in the labs as the sole survivor, ghoulified yet still sane. He gathered all the corpses of his colleagues, made a pyre in the storage room and then took his own life. His ID badge has clearance level GF, -5, -6, -7.
The Electromagnetic Optics Lab (5) is located to the left of the elevators. According to the computer terminals in the room, research was done here to develop a prototype Mk II Stealth Boy. The log details that high ranking members of the military going by the name Enclave pulled the project from RobCo and had it moved to Area 51.The project did not progress very well however and a working prototype was far from finished. In the center of the room stands an experimental cloaking field generator called AIDOS. Activating the device will turn everything in a ten yard range invisible for outside observers. Anyone lingering in the cloaking field for more than a minute must make a Spirit check or start getting a paranoid and delusional feeling, hearing strange sounds, flitting visions in the corner of their eyes, etc. A list of known side effects is listed on the computer terminal. In the room several regular Stealth Boys can be found. A blue force field-protected storage locker contains a captured Chinese Hei Gui Stealth Suit (Stats: +1 Toughness, Invisibility on wearer, 15 lbs).
The Electromagnetic Optics Lab (5) is located to the left of the elevators. According to the computer terminals in the room, research was done here to develop a prototype Mk II Stealth Boy. The log details that high ranking members of the military going by the name Enclave pulled the project from RobCo and had it moved to Area 51.The project did not progress very well however and a working prototype was far from finished. In the center of the room stands an experimental cloaking field generator called AIDOS. Activating the device will turn everything in a ten yard range invisible for outside observers. Anyone lingering in the cloaking field for more than a minute must make a Spirit check or start getting a paranoid and delusional feeling, hearing strange sounds, flitting visions in the corner of their eyes, etc. A list of known side effects is listed on the computer terminal. In the room several regular Stealth Boys can be found. A blue force field-protected storage locker contains a captured Chinese Hei Gui Stealth Suit (Stats: +1 Toughness, Invisibility on wearer, 15 lbs).
The adjoining room contains the Photonic Resonance Research Lab (6) where improved force field technology was tested. All the force fields are disabled. Using the control panel on the far side of the room will cause the electrical circuit in the Research Lab to burn out. This in turn causes the force fields emitters to activate intermittently in intervals of a few seconds, in a completely random fashion.
[Note: These are red force fields which cause 2d10 damage if touched. If anyone caught on the far side of the room wants to try and run back to the entrance then the player must make an Agility check at -2, timing his or her sprints to avoid the barriers. Anyone failing the roll is said to have grazed a force field and takes 2d10 damage. The emitters can also be disabled as usual with a Repair check at -2]
Level -7: The third level of the research facility features the Xenology department. Enemies on this floor include Eyebots, Mr. Handy's and Sentry Bots. To the right of the elevator access is the Nuclear Fusion Reactor (7), which has kept the research facility powered ever since the Great War. Inside the vestibule next to the decontamination shower two Radiation Suits can be found, as well as some doses of Rad-X and RadAway. The Reactor Core (7A) is a Lethal Radiation area. An emergency shutdown can be attempted (Science check at -4) by using the computer terminals in the Reactor Control Room (7B). This powers down all stationary systems on level .
The light blast door at the other end of the hallway leads to the xenology labs. Immediately to the right is the Exobiology Lab (8), closed off with a blue force field. Past the Operating Theater (8A), where basic medical supplies can be found, and a red force field is the Cryogenic Storage area (8B). Various alien looking devices and a couple of space suits, too small to fit a human, lie on the workbenches. The cryogenic pods against the back wall contain four Aliens in total. Three of them have flatlined, but the Alien Captain, a diminutive grey-greenish extraterrestrial with large black eyes and leathery skin, can be revived using the pod's control station (Science check).
The Exotechnology Lab (9) is located on the opposite side of the corridor, also sealed off by a blue force field. Various different weapons and devices based on alien technology, in varying stages of completion, can be found in the main research room. In a storage cabinet protected by a blue force field a half finished prototype T-55x Power Armor can be found, incorporating alien shielding technology for increased durability and damage resistance. In the storage cabinet next to it is an alien Inertia Suppression Field Generator, which can be worn as a belt and grants +1 Toughness when activated. On the workbenches around the room strange alien crystals, function unknown, can be found, as well as few Alien Power Cells. Near the experimental shooting range lies a powerful Alien Blaster (Stats: one-handed Small Gun - Range: 12/24/48 , Damage: 4d6, RoF: 1, Weight 2lbs, AP4, Snapfire, Disintegrates Target, Ammo type: Alien Power Cells).
Dr. Henderson’s Office (10) is located at the far end corner of the level. Dominating the center of this floor is the research facility’s supercomputer, the Data Integration System for Exological Analysis (DIS4EA) (11), a troubled AI.
- War of the words (part II): The following information can be found on the computer terminal in Dr. Gray's Office: It describes the animosity with Dr. Henderson (see part I). The last entry reveals that a programmer from Dr. Gray's department wrote and uploaded the override trojan for the Behemoth's (the prototype Mk II Sentry Bot on level -5) targeting parameters, "as a lark", on October 23th 2077 . Unbeknownst to Dr. Gray however, the Behemoth had the day previous been outfitted with live ordnance, ahead of schedule. Though as it would turn out, no one had tried running the program before the bombs fell.
- ET go home: Once revived the Alien Captain (Stats: Parry 5, Toughness 4, Pace 6 Run Die d6, Fighting d6, Small Guns d10, Notice d8, Stealth d6) will don one of the space suits and an alien wrist computer. He will activate its locator, which emits bleeps and a red blinking light, to track his ship. He will try to make his way topside and continue outside to Hangar 14, under which the UFO is hidden. The Alien Captain is not immediately hostile to the players, but might try and steal back the Alien Blaster if one of the players has found it. The underground area of Hangar 14 can be unlocked through the access panel at the far side of the hangar, which causes the middle part of the floor to slide open. The UFO seems to be in working order. After some repairs the Alien Captain will be able to get it going, take off and blast his way out of the hangar to parts unknown.
- DIS4EA wants to kill himself: The Data Integration System for Exological Analysis is an AI with severe limitations installed by design to keep it solely focused on data compilation and analysis. First activated February 2nd, 2076 , DIS4EA has now been live for almost two centuries. Trapped in solitude with nothing to occupy his mind, DIS4EA has slowly formed the plan to kill himself. Having observed the party’s approach over the security cameras, DIS4EA will use the opportunity to make his request if a player tries to access the computer terminal on the supercomputer. As he has only limited access to the research labs systems (blast doors, force fields, security cameras), he will need the party's assistance to execute his plan. In return he will grant them easy access to the labs by unlocking all security doors and lowering all force fields. Because just shutting down his array or cutting off the power might leave a window open for reactivation at some later time, he will ask the group to sabotage three systems, the simultaneous destruction of which will result in a blast powerful enough to bring down the whole facility. These systems are: the LPAC on level -5, the TPG Ion Thrusters on level -6 and the Nuclear Fusion Reactor on level -7. For each system an uplink must first be created at a control panel, so DIS4EA can remotely activate it once the party has cleared the vicinity.
*The LPAC can be sabotaged by accessing a control panel and setting the cannon to charge beyond maximum safety levels on the next firing (Science check), accessing the cannon and manually opening the plasma coolant chamber (Repair check) or rigging the barrel with explosives (Explosives check).
*The TPG Ion Thrusters can be sabotaged by accessing a control panel and flooding the ionization chambers of the propulsion drive with ambient radiation particles (Science check), compromising the engine's structural integrity by realigning the thrusters (Repair check) or rigging the rocket engine nozzles with explosives (Explosives check).
*The Nuclear Reactor Core can be sabotaged by accessing a control panel in the control room and superheating the plasma beyond acceptable levels, eventually causing a core meltdown (Science check), by entering the core itself and using the manual override access point to eject the core's control rods, again eventually causing a core meltdown (Repair check) or by rigging the magnetic coils with explosives (Explosives check).
Once all this has been done, DIS4EA will lower the remaining force fields on level -7. After the players have exited the base, DIS4EA will activate the systems and destroy the entire main facility.

Basement: The basement area of the base houses general Maintenance systems and services. Enemies on this floor include Eyebots and Mr. Handy's. The first room on the right is the Waste Incineration area (12) where large furnaces were used to do away with the facility’s garbage. Across the hallway is the Laundry Room (13) and next to it the Storage (14A) and Supply Rooms (14B), which hold general janitorial equipment. In the Boiler Room (15) next to defunct heating installation a disabled Mr. Handy can be found. With a Science check he can be reactivated and tasked to perform general maintenance duties or repair any of the machinery, such as the back-up generators which can be accessed through the stairs at the far end of the boiler room. The main corridor eventually reaches a T-junction, which leads to the elevators that connect the Basement with Subbasement 1 and 2.

Subbasement 1: This subbasement is the primary Storage Warehouse (16) for the base. Enemies include Eyebots, Mr. Handy’s and Mr. Gutsy’s. Subbasements 1A to 1G are all packed tight with big wooden crates, containing parts and supplies of all sorts. A forklift is needed to reach the crates and get them off the racks safely. Each subbasement contains approximately 60 crates.
-----------
Subbasement 2: This subbasement is a general duty Warehouse. Enemies include Eyebots, Mr. Handy’s and Mr. Gutsy’s. Situated next to the elevator is the Motor Pool (17A) where a functioning forklift can be found. In the Supervisor’s Office (17B) the computer terminal can be used to obtain shipping manifests for the stored supplies. On the opposite side of the subbasement is a Loading Dock (18) which can be used to return to the surface, next to the main facility.
Next to the storage room in Subbasement 2A are the Back-up Generators in 2B (19). The destruction of the main Power Station seems to have put too much strain on the back-up generators and they have burned out. They can be repaired with spare parts or a Repair check at -2. Alternatively the Mr. Handy in the Boiler Room can be reactivated to perform the repairs. Once the generators have been repaired, flipping the main circuit breaker will power up the entire facility.

Hangar 14: One of many partially collapsed hangars around the base. The hangar is entirely deserted. The roof has collapsed in many places, burying some rooms and a Vertibird under huge piles of rubble. A second Vertibird (20) can be found, which seems in good condition. The control panel at the back wall next to the generator room can be used to open the Hatch (21) in the center of the hall, revealing a second level underground in which a salvaged UFO is stored. This technology is so advanced that even hoping to get it working would undoubtedly require decades of study.

Thanks for sharing your work! As a curiosity, how are you drawing these maps?
ReplyDeleteBryan (NoFairFights @ peginc.com/forum
Hi Bryan, most of the stuff is just hand drawn using gimp and paint.
ReplyDeleteThis comment has been removed by the author.
ReplyDeleteI actually planned to comment with the same question as Bryan, but since that's answered I just say I've been following your updates for about a month with great interest. It's cool to see you publishing your campaign diary with such production and detail.
ReplyDeleteCheers,
Stephen
Thanks Stephen, glad you find it useful! I always enjoy reading about other peoples' campaigns and the things they've created so I thought I'd do the same. :)
ReplyDelete